When I was younger, given the choice, I would always pick chocolate cake over coconut. But as I got older, I really started to appreciate the subtle flavour of coconut — especially in winter.
With a hint of warm spices, coconut’s dreamy qualities are even more pronounced, making it an ideal cake for a winter birthday party. The fact that shredded coconut looks like snow is an added bonus!
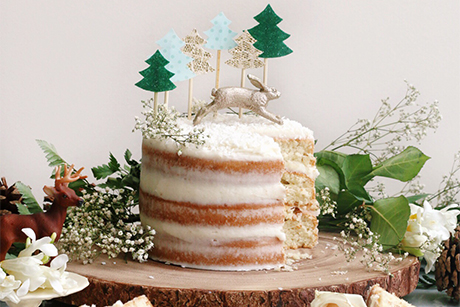
Celebrate a winter birthday with a whimsical, winter wonderland themed party, complete with a snowy coconut cake and rustic decorations.

Give your party a fun, winter wonderland feel by creating a rustic woodland scene complete with DIY evergreen tree toppers, a gold winter hare and lots of shredded coconut. If you want to kick it up a notch, make a shimmering snow scene by dusting some fine edible glitter on top of the coconut layer.

Coconut Chai Cake with Coconut Buttercream
Makes: 1 three-layered 6 inch cake
Coconut Chai Cake:
185 g unsalted butter, at room temperature
1 1/3 cup granulated sugar
3 eggs
2-1/4 cup flour
1-1/2 tsp baking powder
3/4 tsp salt
3/4 cup unsweetened shredded coconut
200 ml coconut milk
100 ml milk
2 chai teabags (~2 tbsp chai tea leaves)
Coconut Buttercream:
227g (1 cup) butter, at room temperature
3 cups icing sugar
3 tbsp coconut milk

Instructions:
1. Preheat oven to 350°F and grease the 6-inch cake pans.
2. Over medium heat, let the two chai tea bags steep in the milk. Once milk comes to a light boil, remove from heat and let tea bags steep for 5-10 minutes. Once milk has cooled down, combine the milk with the coconut milk.
3. In a stand mixer with a paddle attachment, cream the butter and sugar together. Gradually add in the eggs, one at a time.
4. In a separate bowl, whisk to combine flour, baking powder, shredded coconut and salt.
5. Add half of the dry ingredients to the butter-sugar mixture and mix on slow to combine.
6. Pour in the milk and coconut milk and add in the remaining of the dry ingredients. Mix until combined.
7. Divide the mixture evenly among the three prepared cake pans and bake for 33-35 minutes. Check for doneness by using a toothpick. If the toothpick comes out clean, you’re good to go! You can also test for doneness by gently pressing your finger on the cake — it should spring back up.
8. For the icing, using a stand mixer with a paddle attachment cream the butter until mixture is pale in colour and fluffy. Add the icing sugar, one cup at a time and alternating between adding the icing sugar and coconut milk, beat until light and fluffy. Add more coconut milk, 1 Tbsp at a time if buttercream is too thick.
Winter Wonderland Decorations
You’ll Need:
– Skewer sticks
– Assortment of felt, scrapbook paper, card stock
– Glue
– Plastic figurine
– Gold paint (non-toxic)
– Fresh flowers

Tree Cake Toppers
Draw out tree shapes on a variety of scrapbook paper, felt and glitter card stock. Cut out your trees.
Using a hot glue gun, apply a small dollop of glue at the blunt end of a skewer stick. Gently press a paper tree on top of the glue. Let the glue dry for a couple of seconds before arranging on your cake.

Gold Hare Topper
Using non-toxic gold paint (easily found in the kids section at your local arts and craft store), apply a thin coat onto the plastic toy figurine. Apply a second coat if desired. Let paint completely dry (overnight, if possible) before placing on top of cake.
Tip: Your local craft store or toy store will have a great selection of plastic toys that will work as toppers.
By Amy Ho
When she’s not completing statistics homework for her graduate studies, Amy Ho can be found in her tiny kitchen testing recipes and adorning cakes with flowers. She can also be found dreaming up new cake ideas for her blog, Constellation Inspiration.