Comforting, filling and satisfying, bread is the cornerstone of western food culture. And making your own bread is one of the gratifying baking projects. There’s a sense of power and confidence that comes from coaxing four simple ingredients into a dough that grows and then bakes into something so fulfilling.
There is such satisfaction to rip into that loaf of freshly baked bread, a whisper of steam emanating from it, and letting the butter wind in little rivulets as it melts on your first bite. If you’ve always wanted to try making your own loaf, this guide will give you the knowledge and confidence to bake bread at home.
Get the recipe for Anna Olson’s Rustic Ciabatta.
The Four Magic Ingredients
Flour
Bread flour has a higher protein (gluten) content than all-purpose, so when kneaded, the proteins bond, giving the dough strength so it can hold in the air the yeast produces. Many types of bread can be made with all-purpose flour, but if you are getting serious about bread baking, then bread flour is best.
Water
Tap or spring water is a personal choice, but no matter your choice, the temperature is key. Yeast ferments at around 115ºF (46ºC), so your water should be that or a touch warmer. A thermometer isn’t necessary – I just test the water on my wrist – it should feel slightly warmer than body temperature.
Yeast
Yeast is key to fermentation. Yeast feeds on the natural sugars within the flour and generates alcohol and carbon dioxide, which causes your dough to rise. As the bread bakes the alcohol cooks off, while the air bubbles produced by the CO2 stay in place, making the bread airy, fluffy and light.
Leavening Agents
Most bread recipes call for commercial yeast, but there’s more than one way to leaven your bread.
Commercial Yeast
The simplest ways to start fermentation is to add a few teaspoons of dry active or instant yeast. Dry active yeast needs to be dissolved into water, while instant yeast can be added at any time, no dissolving needed.
Starters
A yeast starter is a natural and flavourful way to start fermentation, most commonly used for sourdough bread. To make your own starter, combine equal parts by weight of flour and water. Then add a touch of honey. You could also add a pinch of commercial yeast, which is optional. Place the mixture in a loosely-covered jar on your countertop and let sit for 24-36 hours. The natural yeast in the air will start a fermentation. After using, remaining starter can be re-fed and stored in the fridge, feeding it every two days with the same proportions of flour and water. The longer it ages, the more flavour it develops.
Salt
Salt does more than flavor bread. It also slows fermentation, which is a good thing. The longer a bread is left to rise the better flavour you get and the interior texture becomes stretchy when you tear into it. Commercial breads than have a fluffy cotton-like texture are quickly fermented, where homemade or artisan breads have a chewier texture and more character.
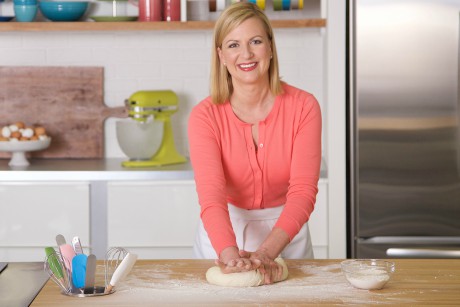
How to Knead Bread
Kneading is the important step of working the dough to develop the proteins in the flour. You can do this by hand or with a mixer equally well, and it is a gratifying step – that feeling of pushing, stretching and pulling the dough is so soothing, and as the dough becomes developed, you will feel it get elastic under your hands.
Don’t be tempted to add too much flour to your dough as you knead it. I like to hold back 1/2 cup of flour from the recipe to use for kneading. Bread dough should still be a little tacky in most cases and barely come away from your hands after kneading.
How to Proof Bread
This is the most important part of bread making, and where you do nothing! Time is key here – the first proof (also called rise) is where the yeast really gets to work, developing flavor and texture. The first proof is usually at room temperature and some recipe call for you to punch down the dough, to challenge the yeast to get to work again.
The second proof happens after shaping, and you can control the timing of this by popping the bread into the fridge (this way you can make, proof and shape your bread dough the evening before, chill it overnight and then proof it in the morning to start the day with freshly baked bread).
Get the recipe for Anna Olson’s Seeded Rye Bread.
How to Shape Bread
Every culture with bread has a style for shaping it. Regions in France and Italy have very specific shapes to their bread, or consider flatbreads and other styles such as naan.
Shaping isn’t just for aesthetics – as the baker, you are knocking out the air from the dough one last time, coaxing that yeast back to work, and this helps develop the crust.
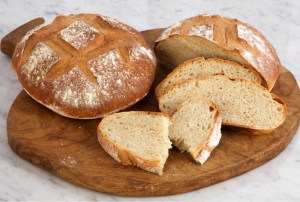
How to Bake Bread
Most bread cooks best in a high temperature oven, to set the crust and get that final burst of leavening. Adding steam, by spraying the inside of the oven with a misting bottle, or placing a tray filled with 2 cups of boiling water helps develop a good crust and a shine to the crust.
You can tell when your bread is baked by lifting it up with a tea towel and tapping the bottom – if it sounds hollow, then it’s done.
If you are baking bread in tins, turn the bread out of the tins immediately from the oven.
The most challenging step when baking bread? Letting it cool at least 20 minutes before slicing or tearing into it!
Can’t wait to get baking? Try Anna Olson’s Best Classic Baking Recipes.