Sure, we can let the pandemic dampen another Halloween or we can make this year’s celebration special in a different way. Wicked or whimsical, macabre or kawaii, the thing that can be said about Halloween treats is that they are always fun and creative. Unleash your inner artist and delight the children (and adults) in your life with these bewitching desserts. All three ideas require no baking – unless you want to! Store-bought baked goods can be elevated with colourful candy melts, royal icing, melted chocolate, fondant and candies to lively (or ghoulish) effect. Everything you need can be sourced from the grocery store, doughnut shop, bulk store or art supply store.
Related: Try This Halloween Pumpkin Bundt Cake
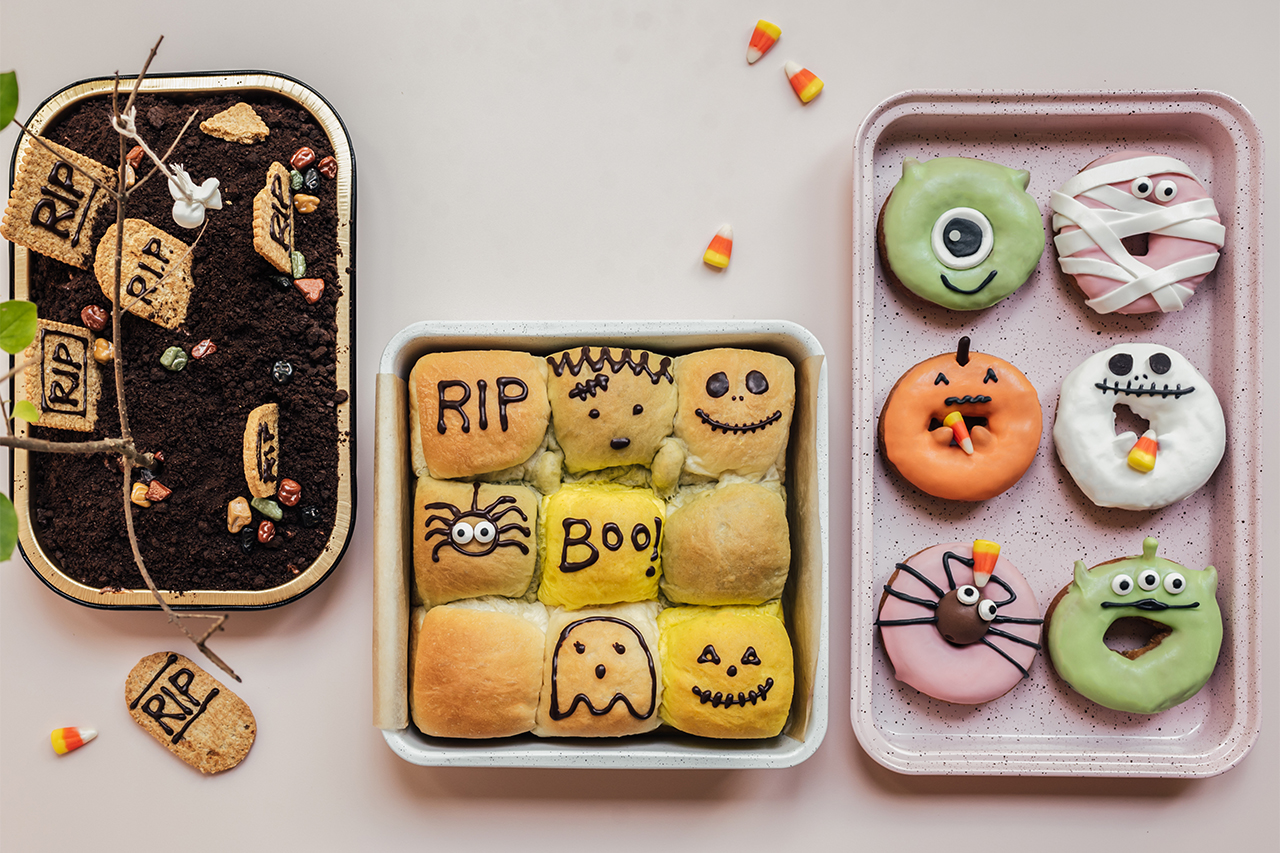
The only from-scratch thing pictured is the buns, which you can sub with frozen or fresh rolls from the supermarket. The fun with these projects is in the design and decorating. Follow my lead or make your own phantom fantasies come to life. My daughters gleefully ate their way through a fair share of these confections, confirming they are as tasty as they are aesthetic. I’m giving you the download on how I created these three boo-licious treats so you can try your hand at one or all of them this holiday. Involve the little boos for a fun at-home activity. Queue the Halloween playlist and get decorating!

Candy-Coated Donut Characters
Ingredients:
Plain doughnuts
Candy melts in desired colours (I used white, pink, green, orange)
Vegetable shortening for adjusting consistency of melted coating as needed (optional)
Small pack of white fondant (for mummy wrapping and eyeball)
Whole almonds for ears and little hands (or use candy corn if nut-allergic)
Dark chocolate chips and candy eyeballs (for eyes)
Chocolate Pocky for alien antennae and pumpkin stem
One dark chocolate ball for spider body
Candy corn or other small candy
Black royal icing
Related: This Candy-Filled Pumpkin Pail is the Perfect Halloween Showstopper
Directions:
1. Prepare candy melt as directed on the package. If the mixture seems thick and somewhat seized, add a dab of shortening to thin out and make it smooth. Pour enough candy melt into a small dish so that it will come halfway up the doughnut. Before dipping, poke in whole almonds for any ears and/or hands in the design. If making the three-eyed alien, break off the plain cookie end of a Pocky and insert it for the antennae.
2. Dip one side of the doughnut to coat. The candy coating will not be smooth immediately. Shake the doughnut side to side quickly to even out the candy coating – yes it actually works! For all black details, I used black royal icing piped out of a bag with a tiny hole cut at the tip for making precise, thin lines. Add decorations as per below.
Related: How to Melt and Temper Chocolate for Perfect Candy Making
For the mummy (top left):
I used pink candy melt as the base. For the mummy wrap, roll out white fondant to 1/8” thickness and cut into thin strips. Drape them onto the donut. Attach candy eyes to the wet candy coating to adhere.
For the skeleton (top middle):
While the candy melt is still wet, adhere two dark chocolate chips with their flat base facing out to create the eyes. Dry thoroughly before decorating with icing. Dot nostrils and draw mouth with black icing.
For the alien (top right):
Before dipping in candy coating, make sure you’ve inserted two almonds on the sides for ears and the cookie end of a Pocky for the antennae. Place three candy eyes while the candy melt is still wet (otherwise glue it on with royal icing). Wait for the candy coating to dry completely before piping the mouth with black icing.
For the spider (bottom right): I used pink candy melt as the base. Add chocolate ball while still wet. Let dry thoroughly. Pipe spider legs with black icing. Use small dabs of black icing to glue candy corn and candy eyes onto the chocolate ball.
For the pumpkin (bottom middle): Before dipping into candy melt, insert almonds for hands. Let dry thoroughly. Draw face with black icing. Break off the chocolate end of a Pocky and insert it as the stem.
For the cyclops (bottom left):
Before dipping into candy melt, insert almonds for ears. Dip in green candy melt. Roll a piece of white fondant and cut a circle that will completely cover the donut hole (I used the larger end of a big piping tip). Place over the donut hole while the candy melt is still wet to adhere. Let dry thoroughly. Pipe a black circle on the white fondant for the pupil. I had a flat white disc sprinkle in a sprinkle mix, so I added that for a little “sparkle” in the eye. You can create the same effect with a tiny circle of white fondant.
Related: Spooky S’Mores Bars Are the Perfect Halloween Treat

Chocolate Decorated Buns
Ingredients:
One batch of rolls, homemade or frozen store-bought and baked according to package directions
Melted dark chocolate
Candy eye
Optional if making from scratch: culinary matcha and turmeric powder to add colour to dough
Directions:
1. If you’re baking dinner rolls from frozen store-bought, prepare them based on package directions and allow to cool fully on a rack before decorating. If you’re making the rolls from scratch, consider using the milk bread recipe in my Honey Scallion Wool Roll Bread, without the filling. Form the dough into balls (about 55g each), stuff them with chocolate chips if you like and bake as dinner rolls for 35 minutes. For optional colouring, after the 10-min kneading step, split the dough into three equal pieces. For one third, knead 1 tbsp culinary matcha for 2 minutes. For second third, knead ½ tsp turmeric powder for 2 minutes. Leave the final third plain.
2. Once your rolls are fully cooled, melt dark chocolate until smooth. Place in a piping bag with a small tip cut at the end. Pipe decorations as desired. For my spider, I also attached candy eyes using small dots of melted chocolate.

Chocolate Cake Graveyard With Hanging Ghost
Ingredients:
Chocolate sheet cake, homemade or store-bought
Oreo cookie crumbs
Crackers or cookies for gravestones
Chocolate rock candies (from bulk store)
Melted dark chocolate for writing on gravestones
For hanging ghost: small piece of white fondant, small candy ball or a small rolled up ball of fondant, piece of twine for hanging
Small branch for the tree (make sure it’s not from a toxic plant)
Related: Pull-Apart Graveyard Cupcakes
Directions:
1. Melt chocolate until smooth and place in a piping bag with a tiny tip cut off. Write “RIP” on cookies for the gravestones. Let dry. For the hanging ghost, roll a piece of white fondant 1/8” inch thick and cut a small circle about 2” in diameter. Roll another piece of fondant into a small ball to fit inside as the ghost head – you can also use a small candy ball. Gently double-knot a piece of twine around the collar, with one end long enough for hanging. Dot two small eyes with melted chocolate.
2. Cover chocolate sheet cake with a generous layer of Oreo cookie crumbs for soil. Insert cookie gravestones into the cake. Scatter rock candies. Trim the bottom of your tree branch for appropriate scale to your cake. Wrap the bottom 1-2” of the branch with cling wrap so it doesn’t come in direct contact with cake, but is concealed once inserted. Insert branch into the cake. Hang fondant ghost off a branch. You may need to tilt the tree to counterbalance the weight of the ghost. Use rock candies at the tree base to stabilize it.
Tune into The Big Bake: Halloween on September 27 at 8 PM ET to see new episodes. Watch and stream all your favourite Food Network Canada shows through STACKTV with Amazon Prime Video Channels, or with the new Global TV app, live and on-demand when you sign-in with your cable subscription.