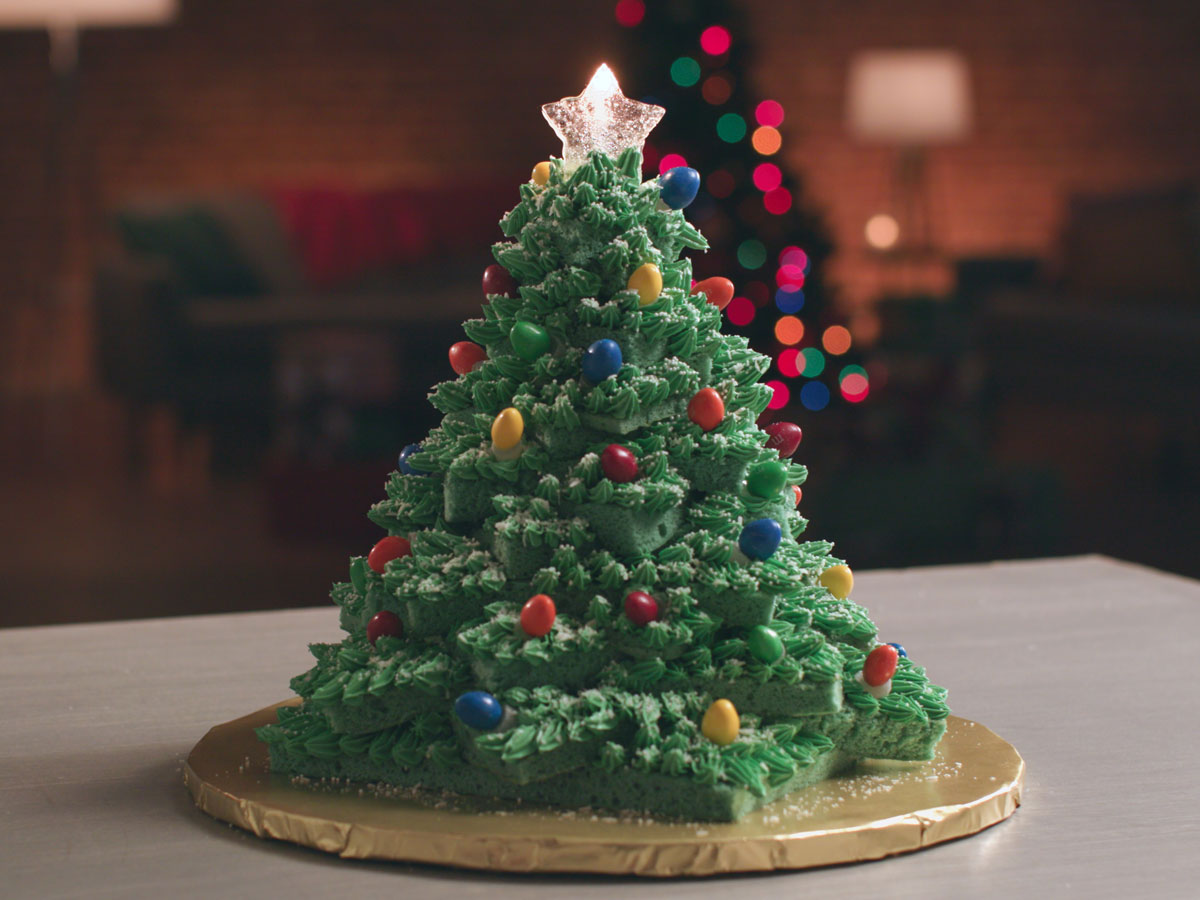
No special cake pan is needed to make this impressive 3D Christmas Tree Cake: cleverly arranged and stacked squares of sheet cake are frosted and decorated with edible “lights.” There’s even a festive star topper.
Special equipment required: Three 18-by-13 rimmed baking sheets; a large cake board or cutting board; a ruler; a piping bag fitted with a small fluted tip; a 2-inch metal star cookie cutter; a birthday candle; a long wooden skewer; an offset spatula
ingredients
Cake
Frosting
Cake Assembly & Decorations
Star Topper & Serving
directions
For the cake: Preheat the oven to 350ºF. Coat three 18-by-13 rimmed baking sheets with cooking spray, then line with parchment and spray the parchment.
Combine the cake mixes and pudding mixes in a stand mixer fitted with the paddle attachment and mix on low to blend. With the speed still on low, add the oil, egg whites, 2 ¼ cups water and 20 drops of forest green food colouring and mix until combined. Raise the speed to medium and mix until increased in volume, lighter in colour and smooth, about 5 minutes.
Pour the batter into the prepared baking sheets; smooth into an even layer using an offset spatula. Bake until golden on top and the edges pull away from the baking sheets, about 15 minutes. Transfer to a rack and let cool completely on the baking sheets, then freeze until firm, about 30 minutes.
For the frosting: Meanwhile, bring a few inches of water to a boil in a saucepan that can hold a heatproof stand mixer bowl above the water without the bottom of the bowl touching the water. Add the sugar, lemon juice, salt and egg whites to the mixing bowl and whisk together by hand. Set the bowl above the simmering water and whisk until the mixture is warm to the touch and the sugar is completely dissolved. Transfer to a stand mixer fitted with the whisk attachment and beat at medium-high speed until cool and the whites hold stiff peaks, 10 to 15 minutes.
Toss in a couple of chunks of butter at a time and continue beating, making sure the pieces are incorporated before adding more. After all the butter is added, continue beating on medium-high speed. The mixture will deflate and appear curdled. Continue beating until the frosting comes back together in a smooth and spreadable consistency. Slowly drizzle in the vanilla and leaf green food colouring while beating; beat until smooth and a vibrant green. (If the frosting is very soft or begins to break, refrigerate until set but still spreadable; beat until lightened before using.)
To assemble the cake: Transfer the first cake to a cutting board and trim the edges with a serrated knife. Use a ruler to divide the cake into two 8-inch squares, two 3-inch squares and three 2-inch squares. Hold in the freezer while you cut the other cakes.
Transfer the second cake to a cutting board and trim the edges with a serrated knife. Use a ruler to divide the cake into one 9-inch square, one 7-inch square, one 4-inch square and one 1-inch square. Hold in the freezer while you cut the other cake.
Transfer the third cake to a cutting board and trim the edges with a serrated knife. Use a ruler to divide the cake into two 6-inch squares, three 5-inch squares and one 4-inch square. Reserve the scraps for another use.
Spread a small amount of frosting onto a large cake board or cutting board to secure the cake. With a large offset spatula, carefully lift the 9-inch square onto the frosting. Spread a layer of frosting in the centre of the cake, avoiding the corners. Place one 8-inch cake square on top of the first square, offsetting it slightly so that the corners of the 2 cakes do not line up. Spread some frosting in the middle of the second cake, avoiding the corners. Place the second 8-inch cake square on top, offsetting it so that the corners do not line up with either cake underneath it. Repeat this process with the remaining cake squares, working with progressively smaller squares and continuing to stack them in offset layers with frosting in between.
Trim a wooden skewer to 10 inches and insert it through the cake from the top down to add support.
Transfer the remaining frosting to a piping bag fitted with a small fluted tip. Pipe rows of separate leaves in a downward motion to cover the exposed tops of all the cakes, creating the illusion of pine needles; leave the sides bare.
For the decorations: Dust the cake with the desiccated coconut and white nonpareils to give the appearance of snow.
To make lights: Cut the gumdrops in half widthwise. Press the cut side of each gumdrop half into the bottom of a candy-coated chocolate to adhere. Press into the freshly piped frosting to make retro Christmas lights.
For the star topper: Preheat the oven to 300ºF. Lightly spray a 2 ½-inch metal, star cookie cutter and a parchment-lined baking sheet with nonstick spray.
Put the cookie cutter on the baking sheet and fill with a single layer of the crushed mint candies. Bake until the candies have melted and filled the cutter, 4 to 6 minutes. Cool for 3 minutes, then unmold.
Before serving, place a birthday candle at the top of the cake with the star topper in front. Light the candle.